Hello & welcome back to the Casually Crafting Blog Hop. This months theme is Nature, and what perfect weather we have had here in the UK to showcase some of the best of nature . Where has the month gone…
The Casually Crafting Design Team are a group of independent Stampin’ Up! demonstrators that want to share our take on casual crafting with you all. We will be sharing what we love every 3rd Friday of each month. Make sure you check out the rest of the Design Team’s creative projects from the photo links at the end of this post.
Rooted in Nature…
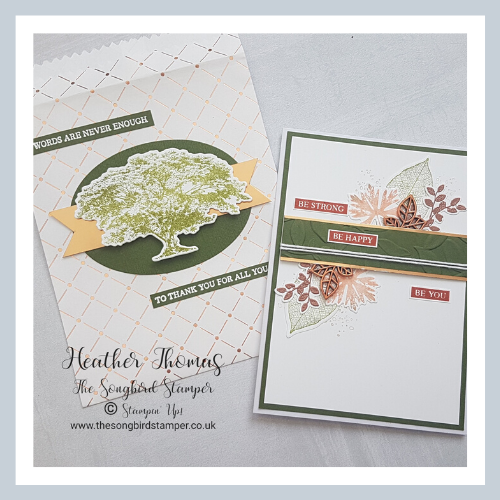
I couldn’t think of a better stamp set to use for this theme than the wonderful Rooted in Nature set. A two case set full of the most wonderful images and sentiments, in lots of different fonts too so plenty for you to choose from. I wanted to keep my card quite clean and simple, and aimed towards the men in our lives. The one thing I get asked to showcase most often is Masculine cards and again, this is my go to stamp set.
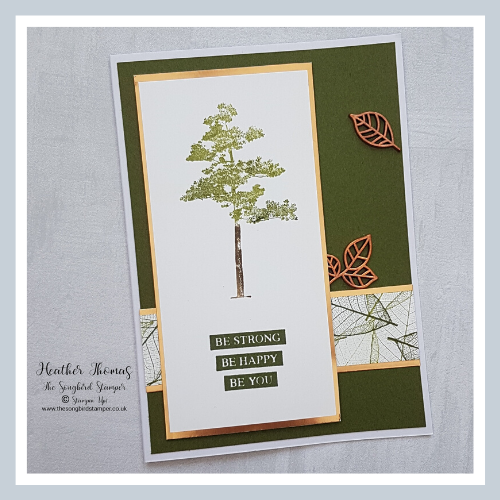
I started with the normal mats and layers, thick Whisper White 21cm x 14.5cm, scored in half at 10.5cm and Mossy Meadow 14cm x 10cm. My White stamped area is cut to 12.5cm x 6cm and it is layered on Copper Foil measuring 13cm x 6.5cm.
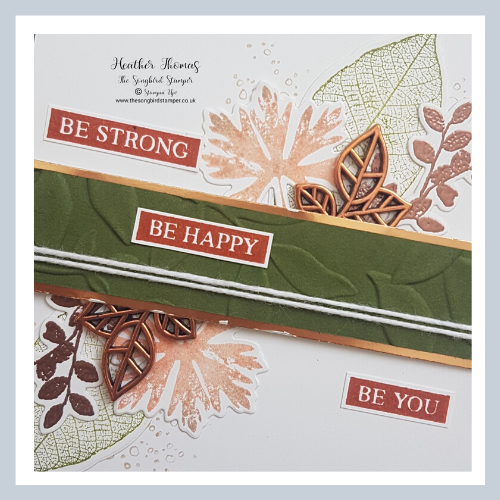
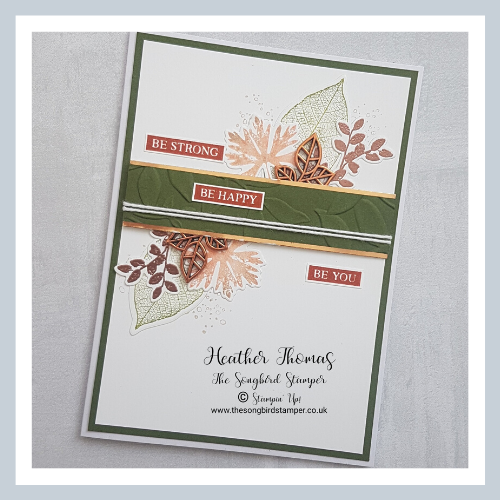
The banner across the front is Whisper White measuring 2.5cm x 10cm and it is layered on Copper Foil measuring 3cm x 10.5cm. I used the gorgeous skeleton leaf images to stamp this piece of white, in Mossy Meadow, Old Olive and Pear Pizzazz, three greens which work so well together.
The tree is stamped using a technique called the Baby Wipe Technique. I used a baby wipe to make my own ink pad, by dropping little drops of ink from the re-inkers on to it. It gives a lovely mottled effect, especially when you use different colours, perfect for the leaves of a tree. If you would like to watch a tutorial, click on the video below where I will show you exactly how to do this.
To get the trunk in brown I put some drops of crumb cake and soft suede under my green drops and stamped on both sections at the same time, to pick up the ink from both areas.
I stamped the greeting underneath my tree in Mossy Meadow, then adhered all of the layers together, and popped the main panel up on dimensionals to give the card some depth. It also meant that I could add one of the gorgeous leaf trinkets poking out from underneath it.
During the video I also show you how to make these two ‘stepped up’ projects. One is a card for my lovely boyfriend to tell him how much I appreciate him, and the other is an extra special envelope for the card, much better than a plain white one, but only good if you aren’t planning on posting your card!

Don’t forget to come back after you have finished the hop to purchase any of the supplies you need simply by clicking on the photo links at the bottom of the page, but for now, enjoy hopping and seeing what the rest of the Casually Crafting Design Team have been up to.
Until next time, Happy Crafting and stay safe xx
 |  |  |  |
- Shop with me online – spend over £20 and receive 10% in Stampin’ Rewards – that’s 10% of your order price back to spend on a future order!
- Click Here to come and join our amazing team of Songbird Stampers, a whole new world of fun and friendship (and discounts!!) await you. Want more information? Why not check out all the FAQs over on the Join My Team page
- Why not follow me on Facebook, for live videos, projects and updates – The Songbird Stamper
- Or Subscribe to me on YouTube – The Songbird Stamper


Lovely cards Heather. I just adore the muted tones with a hint of copper. Very sophisticated
Beautiful projects Heather! I haven’t done the baby wipe technique in ages you’ve inspired me to do it again!