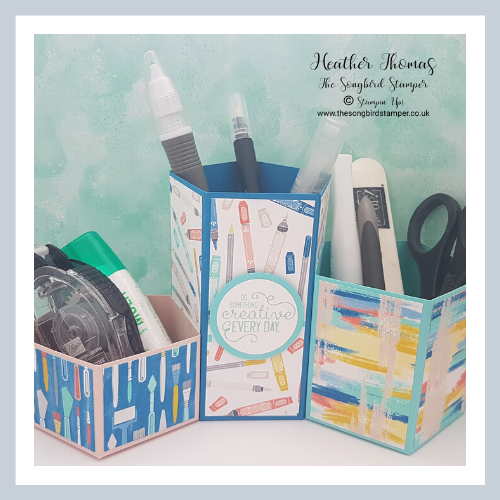
I have been making these desk tidies for a number of years now, they are so quick and easy to make, and cheap too. I just love how you can change them up if you fancy a change of decor, and they look stunning on a desk filled with pens and stamping supplies. What’s even better is that the paper I have used to make this tidy is now reduced to just £6.45, for a whole pack of 12 sheets of 12″ x 12″ paper, filled with images that every crafter needs, pens, scissors, ribbons, and the most gorgeous backgrounds too.
I have used 3 pieces of card to make 3 separate holders which I then glued together. To start, I used a piece of Blushing Bride card measuring 3 3/4″ x 10 1/2″. I scored it on the long side (with the long edge at the top) at 2″, 4″, 6″, 8″ and 10″ and I scored it on the short side (with the short edge at the top) at 2″.
I cut up to the centre score line as shown on the picture below, along the line which is 2″ long, and folded all of the other score lines. It might be easier to watch the video to see exactly which lines to cut and score. On the edge with the tab, I cut away the bigger of the two pieces and made a notch in the one which is left, this will become the tab to stick the holder together.

To assemble the holder, I put some strong adhesive onto the outside of the tab and then loop this around and stick it to the inside of the other end, to make a circle. Then fold all the bottom pieces and glue them in place one by one, making sure to keep the shape of the holder as neat as you can and as hexagonal as you can.
Next, take a piece of Coastal Cabana card measuring 5″ x 10.5″ and follow the same method for scoring as above. Score on the long side at 2″, 4″, 6″, 8″ and 10″ and score on the short side at 2″. Again, follow the same method for cutting, again cutting up the fold lines that are 2″ long to the centre score line and making that tab. Assemble it in the same way as the smaller holder.
The third holder is made from Pacific Point card, measuring 6.5″ x 10.5″. Score as above, on the long side at 2″, 4″, 6″, 8″ and 10″ and score on the short side at 2″. Again, follow the same method for cutting, again cutting up the fold lines that are 2″ long to the centre score line and making that tab. Assemble it exactly the same way as before, you should be getting the hang of this by now. If you would like to watch a video to see how I have cut, scored and assembled each holder, please check out the video below.
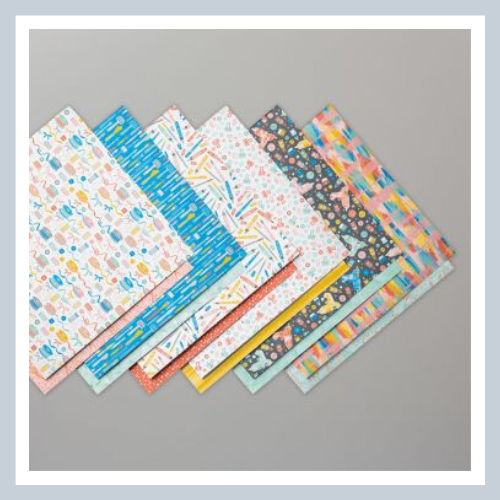
I have used the amazing Follow Your Art DSP for my project, the images just seemed right for the job. I will be sad to see them go but this way I get to look at them every day! For the smaller two holders you will need 4 pieces of paper, and the bigger holder will need 5 pieces, in the following sizes.
- Smallest holder : 4 pieces – 1 3/4″ x 1 1/2
- Middle Holder : 4 Pieces – 1 3/4″ x 2 3/4″
- Biggest Holder: 5 Pieces – 1 3/4″ x 4 1/4″
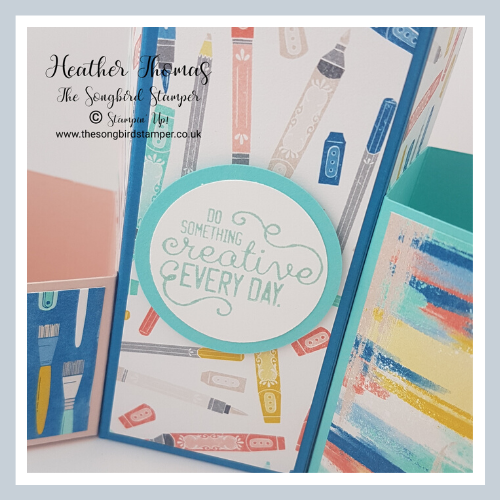
Stick all of the DSP onto the holders and then pop some glue onto the un-papered side of the smallest and middle holders to glue them onto the biggest holder, one on each side as seen in the photograph at the top. I finished my desk tidy quite simply by stamping the saying “do something creative every day” in Coastal Cabana ink onto Whisper White card and punching out using the 1 1/2″ circle punch. I popped it onto a Coastal Cabana circle punched with the 1 3/4″ circle punch and used a dimensional to put this right on the front of the biggest holder, where it can easily be seen as a reminder to me.
I hope you are inspired to make a desk tidy for your own desk, it really is lovely to look at something that you have made and for it to have a purpose too, and don’t forget that this paper is on offer only while stocks last, so don’t delay getting yours if you like it, just click on the images below to go straight to my online store. Until next time, stay safe and Happy Stamping!
Heather xx
- Shop with me online – spend over £20 and receive 10% in Stampin’ Rewards – that’s 10% of your order price back to spend on a future order!
- Click Here to come and join our amazing team of Songbird Stampers, a whole new world of fun and friendship (and discounts!!) await you. Want more information? Why not check out all the FAQs over on the Join My Team page
- Why not follow me on Facebook, for live videos, projects and updates – The Songbird Stamper
- Or Subscribe to me on YouTube – The Songbird Stamper


